Azure DevOps for SQL Server DBAs. Part 2 – Automating Deployments
In the previous post of the series – Azure DevOps for SQL Server DBAs. Part 1 – Creating a Database Project I’ve covered the very starting point – a transformation of a collection of the database objects into a solid deployable unit – the DacPac file. This post is the next logical step – how the DacPac files can be delivered to the group of on-premises SQL Server instances in an automatic, consistent, and efficient way. So, the topic of this post is Azure Pipelines – the CI/CD subsystem of Azure DevOps.
What is Azure Pipelines?
In short, Azure Pipelines is Microsoft’s primary Continuous Integration and Continuous Delivery offering. With Azure Pipelines, DBAs can automate and orchestrate tasks like:
- Build the database project
- Run the static code analysis to detect T-SQL issues, like syntax errors, or even bad practices
- Run unit-tests
- Configure approval gates
- Distribute the database objects among the instances
The items listed above can already be convincing enough but what is the conceptual value behind them?
A few examples:
- Redeployability – Any member of the team can contribute to the codebase by submitting the pull request and any member of the team can trigger the pipeline to deliver those changes to the destination targets. The general idea is – the deployment process is a packaged and reproducible routine that can be repeated at any moment. There is no more constraint in a form of a team member “who always does that”.
- Traceability – Azure DevOps maintains logs nearly for everything. New code contributions, PR approvals, triggered releases… All these operations and many others are logged, and the retention period can be set to years.
- Security – Azure Pipeline can act as a bridge between environments. Even if developers cannot access some sensitive groups of servers, the pipeline can do this. It can deliver deployment artifacts to the secured instance and log the deployment progress.
The common story
Many of us witnessed manual deployments during the midnight overtimes or at the weekend. When the deployment artifact is prepared by “Devs” as the zip archive with instructions in a text file and a bunch of SQL scripts. So, then “Ops”, who normally have an access to the production environment must place targets and sign-off.
The problem with such an approach is communication and ownership. When something is going wrong, the “Ops” guy sends an email that deployment was failed and signs off because that failure is not (really) his problem, it should because of the scripts, instructions, etc.
At the same time, sometimes instructions of “Devs” are not clear enough and their development sandboxes anything but not how the production environment is organized, so the script is not transportable. However, Devs will argue that they cannot reach production machines so Ops are the owners of the deployment failures because they keep production gates closed.
Azure Pipelines (or any other mature CI/CD tool) resolves this problem by automating and packaging the delivery. The deployment process can be modeled and tested on QA and Acceptance environments to catch issues in the early stage. Deployment to the production can be configured to run at a non-business time with the automatic rollback in case of failure. Developers can fine-tune release scripts. The pipeline becomes more and more mature and gains the trust not only of Devs and Ops but acts as the foundation for other improvements.
How can cloud-hosted Azure Pipelines reach on-premises targets?
Azure Pipelines is a SaaS product that runs somewhere in the data centers of Microsoft. To reach targets It uses a concept of agents as intermediate proxies. The agents can be hosted in Azure and on-premises. And just like in the picture below, the Microsoft-hosted agent is mainly to deal with targets that are directly in a sight of this agent. Think of various cloud services. It also can be used to run builds of the code though, since this stage does not require direct contact with destination targets.

In the case of on-premises targets, the solution is to use self-host agents. They act as the on-premises gateway to Azure Pipelines by establishing outbound HTTPS connections. Because such agents have a line of sight to on-premises destination targets, they can arrange a direct connection to them and then do real work – run tasks, deploy artifacts, publish test results back to Azure DevOps, etc.
I do not include installation steps, because such a topic deserves a separate post and other parties did a great job covering this process:
- Self-hosted Windows agents – Official documentation
- How to create and configure AzureDevops Pipelines Agent – alternative guide by DevArts
- Set up your laptop as an Azure DevOps agent to test SQL Server deployments – descriptive article by my colleague Kevin Chant
Self-hosted agents and deployment targets authentication
Another aspect to take into account is authentication. Windows-based agents are mostly configured to run as the service. When the agent connects to the target it uses the service account credential to be authorized:

Therefore, the agent account should have permissions to deploy DacPacs on the target database servers. Sounds simple. However, there is a catch – if the agent is in use by an entire organization this means that everyone is in the organization can push changes to the target database via pipeline.
If shared self-hosted agents are the only option, the workaround can be in the use of SQL Server authentication. In such a case, the password can be stored in Azure DevOps as the “secret variable” or in Azure Key Vault and retrieved by the pipeline to get authorized to run the deployment.
A more secure option for DBA teams is to have their own, isolated, and locked agent pool which will be used only by the SQL Server DBAs team. Further in this post, I will use this model of security.
Building the Pipeline
The final result will be a fairly simple pipeline that uses GitHub Flow. It will have a build and a pair of deployment stages. The list of servers to deploy the dba-db to be passed as the array to the deployment template parameter.
To start with the pipeline, create folder build and place there following three YAML files: main.yaml. build.yaml and deploy.yaml

File 1 – Main pipeline file (build/main.yaml):
trigger:
  branches:
    include:
    - master
    - features/*
  paths:
    include:
    - src/*

pool:
  name: SQL-Team-Pool

# Build Number:
name: 'dbadb$(Date:yyyyMMdd)$(Rev:.r)'

stages:

# Run a build
  - template: templates\stages\build.yaml

# Deployment: Test environment
  - template: templates\stages\deploy.yaml
    parameters:
      environment: Test
      isenabled: true
      database: dbadb
      servers:
      - ServerA

# Deployment: Production environment
  - template: templates\stages\deploy.yaml
    parameters:
      environment: Production
      #only runs if the brach = master
      isenabled: ${{ eq(variables['Build.SourceBranch'], 'refs/heads/master') }}
      database: dbadb
      servers:
      - ServerB
      - ServerC
The main.yaml acts as the orchestrator. This is a place to define pipeline triggers, build naming convention, variables and what stages it should execute.
Files 2 – Template for build stage (build/templates/stages/build.yaml):
stages:

- stage: Build
  displayName: 'Build Database Project'

  jobs:
  - job: Build
    displayName: 'Build Code'

    steps:

    - task: MSBuild@1
      displayName: 'Build a project'
      inputs:
        solution: 'src/dba-db/dba-db.sqlproj'

    - task: CopyFiles@2
      displayName: 'Extract DacPacs'
      inputs:
          CleanTargetFolder: true
          SourceFolder: '$(agent.builddirectory)\s\src\dba-db\bin\Debug\'
          Contents: '*.dacpac'
          TargetFolder: '$(build.artifactstagingdirectory)'

    - task: PublishPipelineArtifact@1
      displayName: 'Publish DacPacs'
      inputs:
          targetPath: '$(build.artifactstagingdirectory)'
          artifact: '_drop'
This template contains steps to build the dacpacs and then upload them to Azure Pipelines.
File – 3 Template for deployment stage (build/templates/stages/deploy.yaml):
parameters:
- name: database
  default: 'dba-db'

- name: servers
  type: object
  default: {}

- name: isenabled
  type: boolean
  default: false

- name: environment
  default: test

stages:
- stage: Deployment_${{ parameters.environment }}
  condition: and(succeeded(), ne('${{ parameters.isenabled }}', 'false'))
  displayName: 'Deployment - ${{ parameters.environment }}'

  jobs:
  - deployment: 'deployment_dacpac_${{ parameters.environment }}'
    displayName: 'Deployment: ${{ parameters.database }}'
    environment: 'deployment-${{ parameters.database }}-${{ parameters.environment }}'

    timeoutInMinutes: 180        # how long to run the job before automatically cancelling
    cancelTimeoutInMinutes: 3

    strategy:
      runOnce:
        deploy:
          steps:
          - ${{ each server in parameters.servers }}:
            - task: SqlDacpacDeploymentOnMachineGroup@0
              displayName: 'Deploy [${{ parameters.database }}] on [${{ server }}]'
              continueOnError: true
              inputs:
                DacpacFile: '$(Pipeline.Workspace)\_drop\dba-db.dacpac'
                ServerName: '${{ server }}'
                DatabaseName: '${{ parameters.database }}'
                AdditionalArguments: '/p:GenerateSmartDefaults=True'
Deploy.yaml contains a code for a single and self-descriptive step – SqlDacpacDeploymentOnMachineGroup@0.
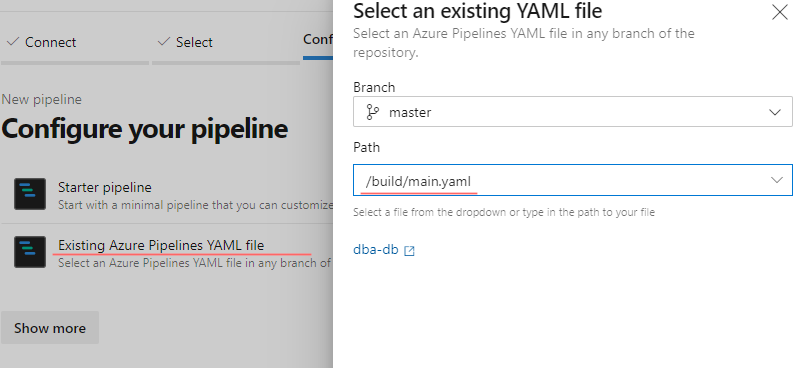
Finally, register a new YAML pipeline:
- Open a New Pipeline page
- Choose a correct repo, in my case it is
dba-db - Choose a type of the pipeline: “Existing Azure Pipelines YAML file”
- Select
/build/main.yamlfrom the Path dropdown list - Save the pipeline
Test run
Let’s run the new pipeline from the context of the feature branch. It will spin a build stage and then deploy the DacPac to the test environment.

Every stage contains jobs and every job consists of steps, so let’s walk through each of them.
The build stage
The role of the build stage is to transform source code (in our case, SQL scripts within a database project) into deployable artifacts. It contains four steps:
- Step 1: Initiates the checkout of the source code. This step is not defined by us in the pipeline code. The Azure Pipelines adds it automatically as the very first step.
- Step 2: Builds the database project using
MSBuild@1. This is the task that generates DacPac files. - Step 3: Extracts DacPacs. It searches such files in the
bin\Debugand copies them to theBuild.ArtifactStagingDirectory - Step 4:
Task PublishPipelineArtifact@1uploads the content of the artifacts folder from a local agent to Azure Pipelines. This step is needed because the actual deployment of the artifacts can be performed by completely different agents. Later I will come back to this topic.

Deployment stage
This stage has a single and a special type of job – deployment job. It has a slightly different schema. However, our implementation still has a fairly simple workflow:
- Step 1: Downloads previously published artifacts by the build stage back from the Azure Pipelines into the agent’s
Pipeline.Workspacedirectory. This is another task that Azure Pipelines adds automatically to every deployment job. - Step 2: This is a combination of the programmatic construction
foreachandSqlDacpacDeploymentOnMachineGroup@0. The task deploys the artifact to ServerA, because only this server was specified in the configuration of the test environment.

Deployment to the production environment looks nearly the same, however, because two servers specified there as the destination targets, two separate steps executed by the pipeline:

Real-life scenarios
This pipeline has a simple structure for demonstrational and introduction purposes. It can be a starting point to “test-drive” the service and the concepts behind it. The real-life scenarios sometimes expect dozens to hundreds of servers to be updated. Therefore, some areas for further improvement:
- The list of database instances can be fetched from a centralized inventory.
- Instances can be distributed within buckets and parallel threads run the deployment by splitting the load on multiple agents.
- The process of dacpac deployment is fully logged and logs upload to the inventory database for further analysis and validation.
The logical workflow in a multi-stage pipeline
As it was mentioned earlier, it is crucial to upload artifacts to Azure Pipelines. This is needed because subsequent jobs can be picked up and executed by other agents. This case is especially actual for scenarios where parallel deployments are involved. Logically the flow looks this way:

Each job runs locally on the self-hosted agent, however, it communicates with remote Azure Pipelines by fetching and uploading execution results.
The source code
The database project and pipeline code can also be found in my repo avolok / azdo-sql-server-dba
Final words
This post was fully about Azure Pipelines. We firstly touched on the theoretical part, then we created a simple YAML pipeline and then drilled into the details of execution steps. While the pipeline does not look very sophisticated at a first glance, it still can be a good starting point in the journey of the DevOps adaptation, and the more you get used to it the more ideas can come to extend it.
In the next post, I would like to cover the next logical step – using the pipeline to deliver SQL Agent jobs in a declarative way!