Azure Data Factory & DevOps – YAML Pipelines
This post is about configuring Azure DevOps YAML pipelines as the CI/CD process for the Azure Data Factory. It provides rational points on why YAML can be a preferable alternative to Classic pipelines. Also, it demonstrates a basic scenario – a YAML pipeline that runs an automatic deployment of the Azure Data Factory objects to a staging environment.
Prerequisites
- Source Control enabled instance of ADF. The development environment should have already a source control integration configured. This aspect was illustrated previously in a post: Azure Data Factory & DevOps – Integration with a Source Control
Why YAML Pipelines?
We all love the old way of how our CI/CD processes were built in TFS, TFVS or Azure DevOps. This is because of:
- the versatility of easy to use tasks as building blocks
- a clean user interface where the main focus is set to easy a mouse operations
However, Microsoft now calls this type of pipeline as “Classic” and advises switch to the new alternative – YAML pipelines. The very basic YAML pipeline can be a single file and looks this way:
pool:
  vmImage: 'ubuntu-16.04'

jobs:
- job: Job A
  steps:
  - bash: echo "Echo from Job A"

- job: Job B
  steps:
  - bash: echo " Echo from Job B"
So, the entire CI/CD process can be declared as a single YAML file. It also can be split into smaller pieces – re-usable templates. This brings some benefits:
- The definition of the pipeline is stored together with the codebase and it versioned in your source control.
- The changes to the pipeline can break a build process the same way as changes to the codebase. Therefore, peer-reviews, approvals applied also to a pipeline code.
- The complex pipelines can be split into re-usable blocks – templates. The templates conceptually similar to SQL Server’s stored procedures – they can be parameterized and reused.
- Because the pipeline is a YAML code, it offers an easy refactoring process. The common tasks like a search of a string pattern or variable usage become a trivial operation. In a classic pipeline, it requires to walk-through each step in a UI and checks every field.
I published recently a step-by-step guide for Classic pipelines: Azure Data Factory & DevOps – Setting-up Continuous Delivery Pipeline. However, it is a time now to look into the alternative.
The development environment
The primary idea of using YAML approach together with Azure Data Factory is in embedding helper files like release definitions and ARM templates into the adf_publish branch.
Before we get started building a pipeline, let’s ensure that our existing ADF instance, where development will take a place, is source control enabled and it has all necessary artifacts that will be used later during the deployment.
Step 1. Check the connected repo and branches
The ADF should already be linked to a GIT repo. And the repo should have a special branch adf_publish. For the rest of the post, we will focus only on this branch exclusively.
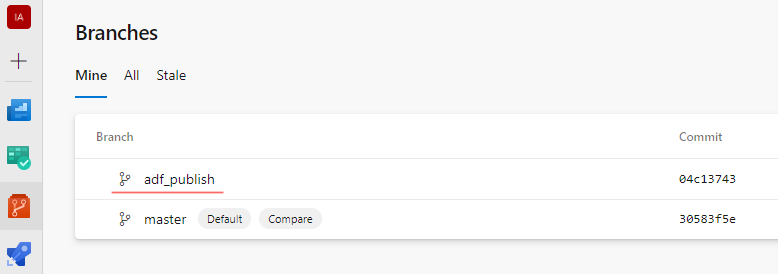
The branch adf_publish created and then maintained by an ADF publish process. Therefore, whenever we hit a button Publish in ADF UI, this branch is updated with an up-to-date ARM template. This template can be deployed to sub-subsequent environments.
If this still not a case take a look at how to do this in a post: Azure Data Factory & DevOps – Integration with a Source Control
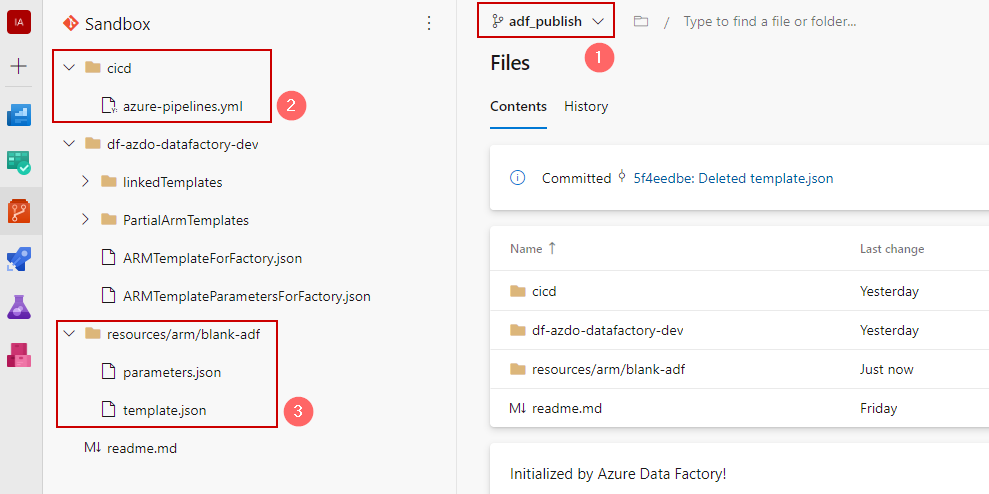
Step 2. Add a few extra files
The publishing branch by default holds an auto-generated ARM template of a linked Azure Data Factory on a moment when a publish button pressed. However, to proceed some extra items to be added:
- Make sure that the branch
adf_publishis selected - Create a folder
cicdand place there an empty file:azure-pipelines.yml. - Create folders and sub-folders:
resources/arm/blank-adfand place there two files:parameters.jsonandtemplate.jsonwith a content as stated below:
template.json:
{
    "$schema": "https://schema.management.azure.com/schemas/2015-01-01/deploymentTemplate.json#",
    "contentVersion": "1.0.0.0",
    "parameters": {
        "name": {
            "defaultValue": "myv2datafactory",
            "type": "String"
        },
        "location": {
            "defaultValue": "East US",
            "type": "String"
        },
        "apiVersion": {
            "defaultValue": "2018-06-01",
            "type": "String"
        }
    },
    "resources": [
        {
            "type": "Microsoft.DataFactory/factories",
            "apiVersion": "[parameters('apiVersion')]",
            "name": "[parameters('name')]",
            "location": "[parameters('location')]",
            "identity": {
                "type": "SystemAssigned"
            },
            "properties": {}
        }
    ]
}
parameters.json:
{
    "$schema": "https://schema.management.azure.com/schemas/2015-01-01/deploymentParameters.json#",
    "contentVersion": "1.0.0.0",
    "parameters": {
        "name": {
            "value": "df-azdo-datafactory-stg"
        },
        "location": {
            "value": "westeurope"
        },
        "apiVersion": {
            "value": "2018-06-01"
        }
    }
}
These two files are ARM templates to deploy blank instance of ADF, which is required as a container for a further deployment of pipelines, datasets linked services, etc.
When all folders and files created the repo should be like this:
Basic YAML pipeline
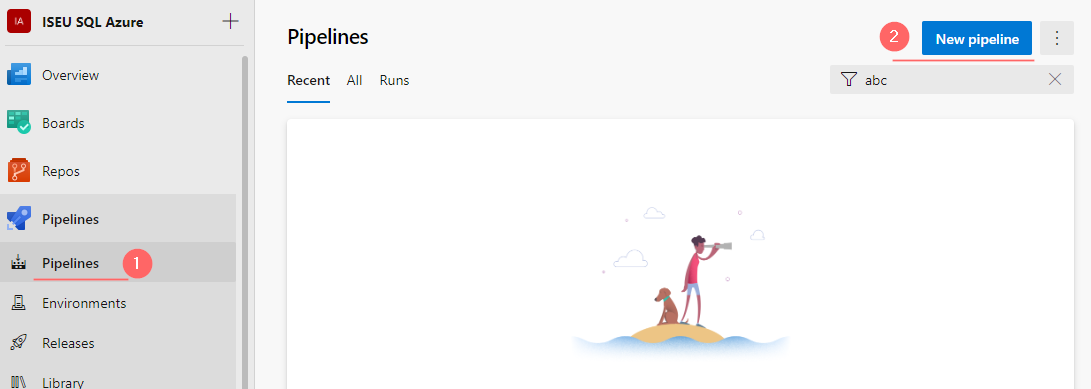
Step 1. Register a YAML pipeline
Navigate to Pipelines -> Pipeline and click on a button “New pipeline”:
Then:
- choose “Azure Repos Git – YAML”
- select a repository of the project
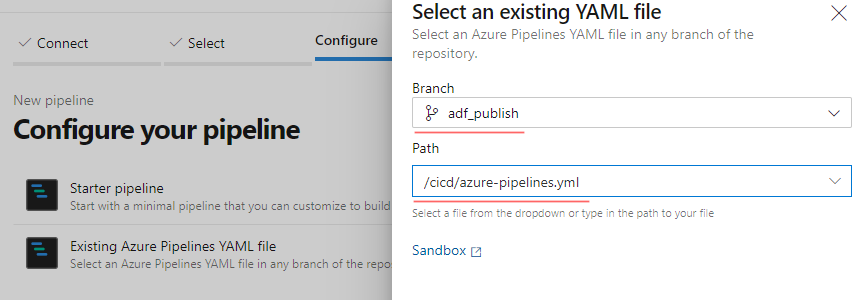
- choose “Existing Azure Pipelines YAML file
- In a Select an Existing YAML file wizard:
- Choose a branch: adf_publish
- In a Path choose your recently added azure-pipelines.yml
These steps will result in the creation of the first pipeline, which contains:
- Name of the pipeline
- Online code editor
- A toolbar with tasks

Step 2. Write a YAML code
Place the following code into the editor and adjust the variable block:
# Basic YAML pipeline for Azure Data Factory by Alex Volok


# Batching trigger set run only on a adf_publish branch
# cicd folder is not watched
trigger:
  batch: true
  branches:
    include:
      - adf_publish
    exclude:
      - master
  paths:
    exclude:
      - cicd/*
    include:
      - "*"


# Adjust variables, set a dummy product name, environment and a name of the subscription
variables:
   ProductName: "azdo-datafactory"
   Environment: "stg"
   Subscription: "Visual Studio Enterprise Subscription(057c6407-ffc7-411f-b995-deed52ec03e5)"


# The build agent is based on Windows OS.
# Linux agents have some differences in available commands and folder paths expressions, etc
pool:
   vmImage: "windows-latest"


steps:

# Step 1: Checkout code into a local folder src
- checkout: self
  path: src


# Step 2a: Find arm json files for a deployment of blank adf in a src and copy them into the artifact staging folder
- task: CopyFiles@2
  inputs:
    SourceFolder: '$(Pipeline.Workspace)\src\resources\arm\blank-adf'
    Contents: '**/*.json'
    TargetFolder: '$(build.artifactstagingdirectory)\arm'
    CleanTargetFolder: true
    OverWrite: true
  displayName: 'Extra ARM - Blank ADF Service'
  enabled: true

# Step 2b: Find other adf files, which will deploy pipelines, datasets and so on  in a folder adf_publish and copy them into the artifact folder
- task: CopyFiles@2
  inputs:
    SourceFolder: '$(Pipeline.Workspace)\src'
    Contents: '**/*ForFactory.json'
    TargetFolder: '$(build.artifactstagingdirectory)\adf_publish'
    CleanTargetFolder: true
    OverWrite: true
    flattenFolders: true
  displayName: 'Extract ARM - ADF Pipelines'
  enabled: true


# Step 3: Debugging - print the output of the command tree of artifacts folder
- powershell: |
    tree "$(build.artifactstagingdirectory)" /F
  displayName: "Debug: Show a directory tree"


# Step 4: Deploy a blank Azure Data Factory instance using ARM templates
- task: AzureResourceManagerTemplateDeployment@3
  inputs:
    deploymentScope: 'Resource Group'
    azureResourceManagerConnection: '$(Subscription)'
    action: 'Create Or Update Resource Group'
    resourceGroupName: 'rg-$(ProductName)-$(Environment)'
    location: 'West Europe'
    templateLocation: 'Linked artifact'
    csmFile: '$(build.artifactstagingdirectory)\arm\template.json'
    csmParametersFile: '$(build.artifactstagingdirectory)\arm\parameters.json'
    overrideParameters: '-name "df-$(ProductName)-$(Environment)"'
    deploymentMode: 'Incremental'
  displayName: Deploy ADF Service
  enabled: true


# Step 5: Deploy Azure Data Factory Objects like pipelines, dataflows using ARM templates that ADF generate during each publish event
- task: AzureResourceManagerTemplateDeployment@3
  inputs:
    deploymentScope: 'Resource Group'
    azureResourceManagerConnection: '$(Subscription)'
    action: 'Create Or Update Resource Group'
    resourceGroupName: 'rg-$(ProductName)-$(Environment)'
    location: 'West Europe'
    templateLocation: 'Linked artifact'
    csmFile: '$(build.artifactstagingdirectory)\adf_publish\ARMTemplateForFactory.json'
    csmParametersFile: '$(build.artifactstagingdirectory)\adf_publish\ARMTemplateParametersForFactory.json'
    overrideParameters: '-factoryName "df-$(ProductName)-$(Environment)"'
    deploymentMode: 'Incremental'
  displayName: Deploy ADF Pipelines
  enabled: true
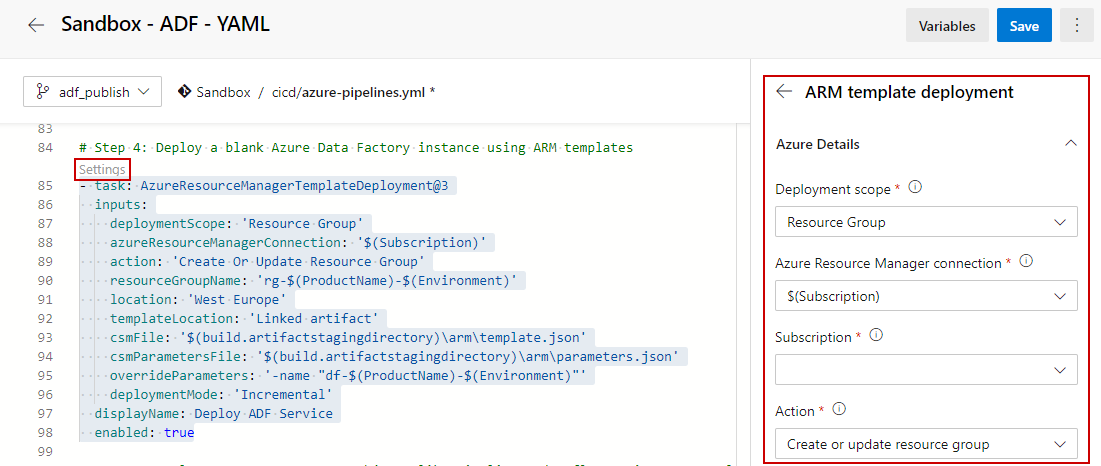
Even though that YAML was designed for clarity and easiness of reading the code, sometimes it is still easier to edit the code by using a task wizard. It can be opened when a new task to be created, but also when you want to adjust an existing task. For this, click on a grayed text “Settings”:
Let’s proceed to test after adjusting the file and saving it.
Step 3. Test a pipeline
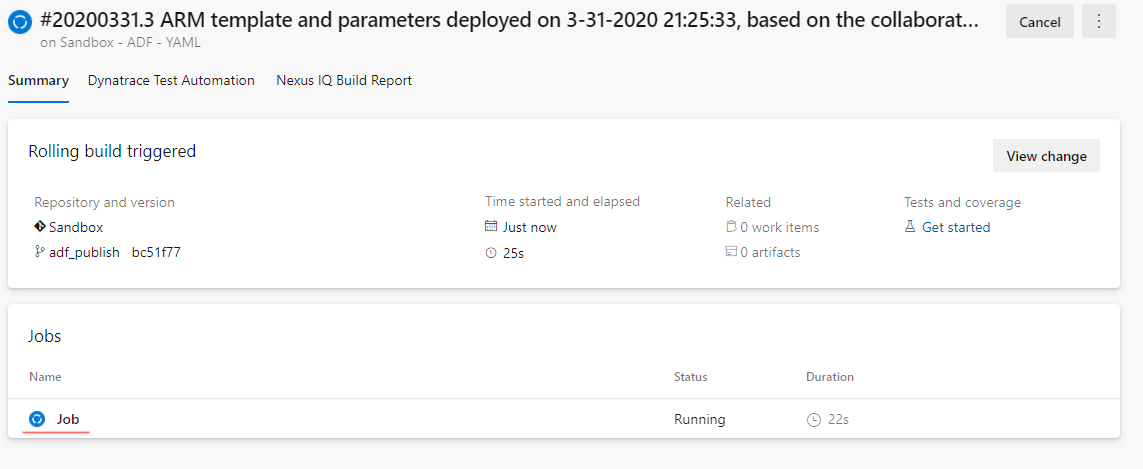
To trigger a pipeline make a dummy adjustment in the development environment of a data factory. For instance, change a description of some activity. Then save changes and publish them. When the publish button pressed the ADF automatically commit changes to an adf_publish branch, which triggers a pipeline:

By clicking on it you can see a more detailed view with a list of all jobs running. In our case it is a simple single-stage / single-job batch:
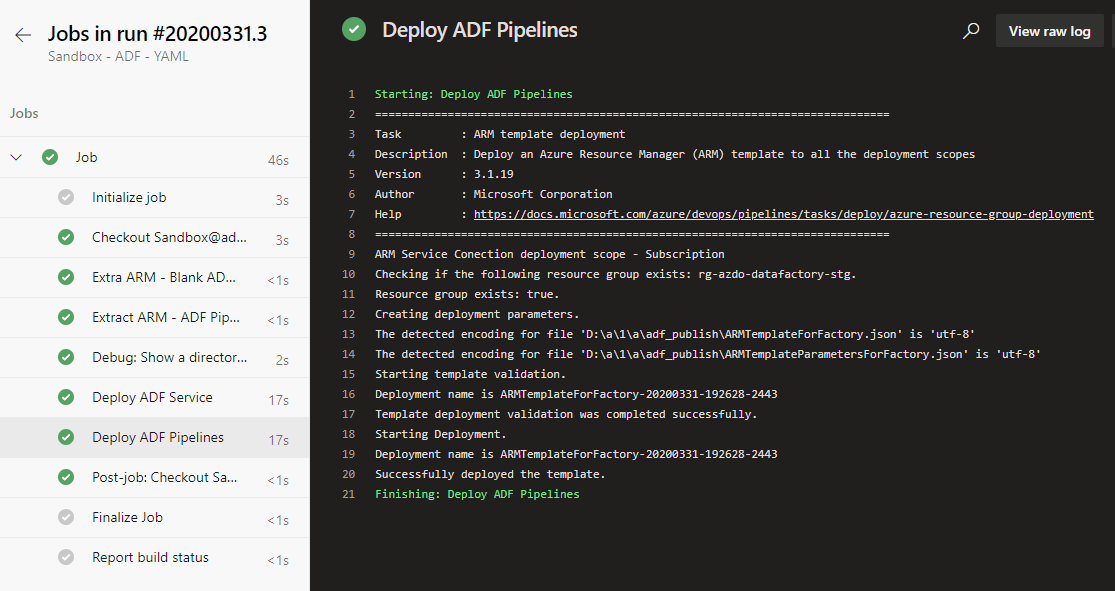
By clicking on a job you can get into very much detailed logs page where the information sliced per task:
That’s it. The single YAML file can be a replacement to the old approach where all such tasks had to be added manually using a mouse and a web UI.
Final words
This post is about using Azure DevOps YAML pipelines as the CI/CD process for the Azure Data Factory. It brings rational points about why YAML can be used now and what benefits it can bring in comparison with the “Classic” approach. I also included a very basic but working example of the pipeline. In a coming post, I would like to touch more advanced topics: parameterized templates, stages, jobs, and dependencies.
Many thanks for reading.