Azure Data Factory & DevOps – Automated Deployment via Azure CLI
In a coming series of posts, I would like to shift a focus to subjects like automation and DevOps. This post will show how the entire Data Factory environment and surrounding services can be deployed by a command line or be more precise, by the Azure CLI.
Such an approach may look tedious and overkilling at a first glance, however, it pays back since it brings nice things like reproducibility, enforcement of standards, avoidance of human mistakes.
Our sample environments
Beside of a plain data factory, it is not uncommon that data engineers use some extra Azure services. Often the landscape also includes a storage account, key vault, etc. All these pieces create together isolated environments for every stage: Development, Acceptance, and Production.
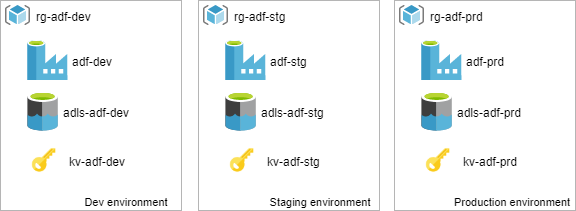
The picture above illustrates the importance of standardization and naming convention. All thee environments do not just look similar, they are created and named consistently. The most important aspect is that strict naming is a base for further automation, scripting and DevOps.
Prerequisites
- Azure CLI. This is a modern cross-platform command-line tool to manage Azure services. It comes to a replacement to the older library AzureRM. Read more: Azure PowerShell – Cross-platform “Az” module replacing “AzureRM”.
And there are a few ways of using it:
- Using a Cloud Shell. It can be initiated directly from a top azure panel:
- Locally, for instance via the PowerShell command line. For this, a local installation of AZ CLI is required. For the installation tips check: Install the Azure CLI
Coding a PowerShell script
Step 1: A naming convention and resource names
First things first, let’s define a basic input like the location of the new azure resources, name of the environment and pick a right stage: dev, test or production:
#az login
param([String]$EnvironmentName = "adf-devops",`
      [String]$Stage = "dev",`
      [String]$Location = "westeurope"`
      )


$OutputFormat = "table"  # other options: json | jsonc | yaml | tsv


# internal: assign resource names
$ResourceGroupName = "rg-$EnvironmentName-$Stage"
$ADFName = "adf-$EnvironmentName-$Stage"
$KeyVaultName ="kv-$EnvironmentName-$Stage"
$StorageName = "adls$EnvironmentName$Stage".Replace("-","")
And then a one-liner to check values of variables:
Get-Variable ResourceGroupName, ADFName, KeyVaultName, StorageName | Format-Table

Step 2: Resource Group
The next logical step is to create a Resource Group that will act as a container for remaining services:
# Step 2: Create a Resource Group
if (-Not (az group list --query "[].{Name:name}" -o table).Contains($ResourceGroupName))
{
    "Create a new resource group: $ResourceGroupName"
    az group create --name $ResourceGroupName --location $Location --output $OutputFormat
}`
else
{
   "Resource Group: $ResourceGroupName already exists"
}
The code snippet checks for the existence of the resource with the same name before it created.
For the Azure Resource Group it is not an absolute requirement since Az CLI will not raise alerts or warnings if such resource already exists. However, some other services will do this.
Step 3: Key Vault and Storage Account
Creation of Key Vault and Storage accounts has a very similar logic to a Resource Group:
# Step 3a: Create a Key Vault
if (-Not (az keyvault list --resource-group $ResourceGroupName ` --query "[].{Name:name}" -o table).Contains($KeyVaultName))
{
    Write-Host "Creating a new key vault account: $KeyVaultName"
    az keyvault create `
       --location $Location `
       --name $KeyVaultName `
       --resource-group $ResourceGroupName `
       --output $OutputFormat

}`
else
{
    "Key Vault: Resource $KeyVaultName already exists"
}

# Step 3b: Create a Storage Account
if (-Not (az storage account list --resource-group $ResourceGroupName --query "[].{Name:name}" -o table).Contains($StorageName))
{
       Write-Host "Creating a new storage account: $StorageName"

       az storage account create `
       --name $StorageName `
        --resource-group $ResourceGroupName `
        --location $Location `
        --sku "Standard_LRS" `
        --kind "StorageV2" `
        --enable-hierarchical-namespace $true  `
        --output $OutputFormat
}`
else
{
    "Storage: Account $StorageName already exists"
}
Step 4: Adding a Data Factory
In contrast to other azure services, that are listed in this post, the Data Factory still has no support of Azure CLI, therefore, there still no command like:
az datafactory create --name adf-devops …
The workaround is to use an ARM template which is placed to a storage account or stored on a locall filesystem.
This is a basic template and it creates just an empty datafactory:
{
    "$schema": "https://schema.management.azure.com/schemas/2015-01-01/deploymentTemplate.json#",
    "contentVersion": "1.0.0.0",
    "parameters": {
        "name": {
            "defaultValue": "myv2datafactory",
            "type": "String"
        },
        "location": {
            "defaultValue": "East US",
            "type": "String"
        },
        "apiVersion": {
            "defaultValue": "2018-06-01",
            "type": "String"
        }
    },
    "resources": [
        {
            "type": "Microsoft.DataFactory/factories",
            "apiVersion": "[parameters('apiVersion')]",
            "name": "[parameters('name')]",
            "location": "[parameters('location')]",
            "identity": {
                "type": "SystemAssigned"
            },
            "properties": {}
        }
    ]
}
I keep it locally and will use later by a az group deployment command:
# Step 4: Create a Data Factory
az group deployment create `
  --resource-group $ResourceGroupName `
  --template-file "./adf.json" `
  --parameters name=$ADFName location=$Location `
  --output $OutputFormat
Step 5: The Final Script
It is a time to glue all parts together into a single script that will be used to generate development, test and production environments.
I saved the script locally as Create-Environment.ps1 in the same folder as adf.json was saved previously
# Step 1: Input parameters
param([String]$EnvironmentName = "adf-devops",`
      [String]$Stage = "dev",`
      [String]$Location = "westeurope"`
      )
$OutputFormat = "table"  # other options: json | jsonc | yaml | tsv
# internal: assign resource names
$ResourceGroupName = "rg-$EnvironmentName-$Stage"
$ADFName = "adf-$EnvironmentName-$Stage"
$KeyVaultName ="kv-$EnvironmentName-$Stage"
$StorageName = "adls$EnvironmentName$Stage".Replace("-","")
Get-Variable ResourceGroupName, ADFName, KeyVaultName, StorageName | Format-Table


# Step 2: Create a Resource Group
if (-Not (az group list --query "[].{Name:name}" -o table).Contains($ResourceGroupName))
{
    "Create a new resource group: $ResourceGroupName"
    az group create --name $ResourceGroupName --location $Location --output $OutputFormat
}`
else
{
   "Resource Group: $ResourceGroupName already exists"
}


# Step 3a: Create a Key Vault
if (-Not (az keyvault list --resource-group $ResourceGroupName ` --query "[].{Name:name}" -o table).Contains($KeyVaultName))
{
    Write-Host "Creating a new key vault account: $KeyVaultName"
    az keyvault create `
       --location $Location `
       --name $KeyVaultName `
       --resource-group $ResourceGroupName `
       --output $OutputFormat
}`
else
{
    "Key Vault: Resource $KeyVaultName already exists"
}


# Step 3b: Create a Storage Account
if (-Not (az storage account list --resource-group $ResourceGroupName --query "[].{Name:name}" -o table).Contains($StorageName))
{
       Write-Host "Creating a new storage account: $StorageName"

       az storage account create `
       --name $StorageName `
        --resource-group $ResourceGroupName `
        --location $Location `
        --sku "Standard_LRS" `
        --kind "StorageV2" `
        --enable-hierarchical-namespace $true  `
        --output $OutputFormat
}`
else
{
    "Storage: Account $StorageName already exists"
}

# Step 4: Create a Data Factory
az group deployment create `
  --resource-group $ResourceGroupName `
  --template-file "./adf.json" `
  --parameters name=$ADFName location=$Location `
  --output $OutputFormat
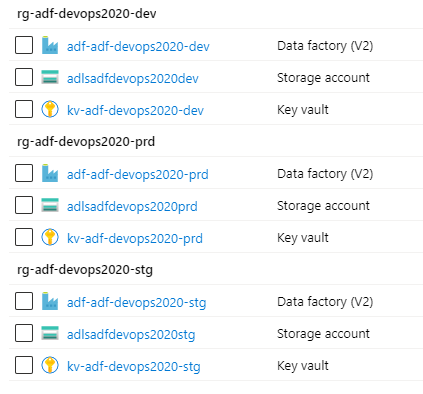
Development, Staging and Production environments in five minutes
Let’s try it in action. Let assume, that the new project has to be started. It has a name adf-devops2020. We tasked to create development, staging and production environments.
The following a few lines will do this work:
# Development, Staging and Production:
.\Create-Environment.ps1 -EnvironmentName "adf-devops2020" -Stage "dev" -Location "westeurope"
.\Create-Environment.ps1 -EnvironmentName "adf-devops2020" -Stage "stg" -Location "westeurope"
.\Create-Environment.ps1 -EnvironmentName "adf-devops2020" -Stage "prd" -Location "westeurope"
And, after five minutes of the execution the Azure Portal confirms:
Final words
The Azure CLI script is complete. It automates the creation of the entire data engineering landscape and brings some extra goodies. Those goodies are enforced naming convention, standardization and some time-saving. Especially if the same task repeats during each project intake step. In the next post Post Deployment Configuration via Azure CLI – I touch a configuration of the environments in a similar scripting fashion.
Many thanks for reading.